My family and I always leave with a beautiful memory of the beach !
It can be a little sand, a few shells or beautiful pebbles worn by the waves...
Any of these items make a great keepsake for kids.
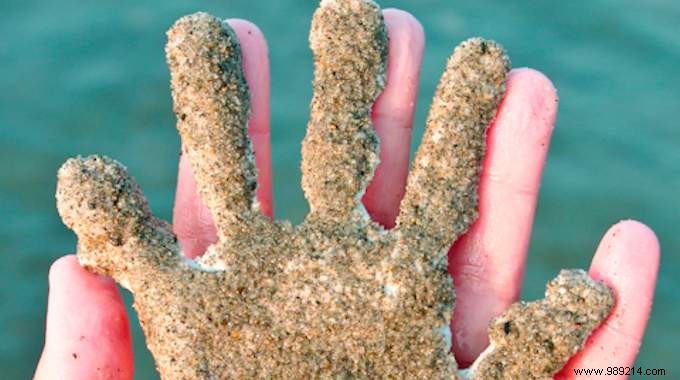
Do you also like holiday memories? So, how about making a plaster handprint at the beach?
Nothing is more moving than finding the tiny size of your child's hand, the first time he saw the sea!
To make a plaster handprint at the beach, nothing could be simpler!
All you need is casting or paris plaster. Watch:
This plaster adapts very well to a sand mold that you can make directly on the beach.
And it mixes just as well with seawater as with tap water.
So it's ideal for making a handprint in the sand that you can take home.
In addition, a fine film of sand remains stuck to the plaster, just enough to remember your stay by the sea.
And it will certainly entertain (and occupy) your children! And it will cost you next to nothing.
- plaster of Paris:200 g of plaster is enough to make 4 handprints of a young child, 2 footprints of a young child, the footprints of an adult and a child, or just the footprint of an adult.
- resealable freezer bag:use an old Ziploc type bag that you are about to throw away.
- measuring cup
- bucket
1. Before going to the beach, measure the necessary amount of plaster and put it in the freezer bag.
2. When you pack your things for the beach, bring the bag of plaster, the measuring cup to add the sea water and a bucket that you can fill with water.
3. At the beach, find a spot with slightly damp sand like the one just below the tide line.
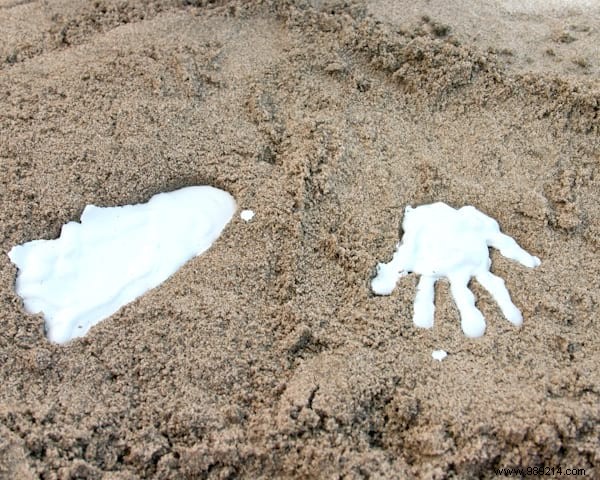
4. Press your hand or foot firmly into the sand. After a few seconds, lift the foot or hand vertically so as not to damage the print. The goal is to have a relatively deep impression to avoid having a mold that is too thin in the end.
5. Now go get some sea water in your bucket and take the amount needed to make the plaster.
6. Pour the right amount of water into the bag and close it with the zip.
7. Knead and shake the plastic bag until the plaster is completely mixed.
8. Tear a corner of the plastic bag to make an opening.
9. Then pour the plaster into the sand to fill in the indentations you just made in the sand.
10. Check the instructions on the plaster package to find out how long you should wait before unmolding your impression.
11. Very gently lift the print to release it from the sand and rinse it quickly in the sea.

There you go, your plaster handprint is already done :-)
The whole family will love this beach keepsake!
Plus, it makes a great gift for grandparents when they get home!
It's still more original than buying a poor quality souvenir, made in China, isn't it?
And it's also much more economical!
- In order not to be mistaken about the amount of plaster to take, read the instructions on the package. In general, the ratio is 1 part water to 1.5 parts plaster.
- In order not to invert the proportions of water and plaster, I write on a piece of paper the amount of water I need.
- To make the imprint, preferably choose a place where the sand is wet because it will better imprint the shape of the hand or foot. This will make the mold clearer and cleaner.
- If your child has trouble making a deep footprint in the wet sand, take them back to the dry sand to make it easier.
- For the imprint to be deep enough, it will surely be necessary to press gently but firmly on the child's foot or hand, to help him make an imprint deeper than what he has strength to do for himself. Especially if it's a baby!
- Of course, you don't have to make a footprint or a handprint. You can also dig and draw in the sand to make a mold with an artistic shape.
- The advantage of the plastic bag is that it is even easier than mixing the plaster in a bowl. In addition, you can easily feel if there are still pieces of plaster to be mixed in the bag.
Check the instructions on the plaster package to find out how long you should wait before unmolding your impression.
- Be careful, depending on the temperature of the sand, you may have to wait a little longer than indicated, for the plaster to harden.