By wanting to fix a soap dish in the shower, you have just drilled a recessed water inlet. The first reflex:close the circuit. Then, just roll up your sleeves! With the right tools and a bit of method, it is not difficult to repair the leak. We chose this example because it is undoubtedly the most common.
The fateful hole goes through a wall tile, located just above the taps. It is therefore necessary to break the ceramic to release the pipe, as well as the mortar which coats the copper pipe.
To repair the latter, only pierced on one side, braze welding is used. The masonry is then filled in to replace the tile.
The mixer cups overflow onto the offending tile:unscrew them a few turns so that they do not interfere with the operation. Score the tile with a glass cutter wheel or a tungsten carbide point. The thin ceramic will thus fragment more easily during chiseling.
Protect the shower with a thick blanket, then break the tile with a small flat chisel, held at an angle, and a hammer. Proceed from the center to the edges. Control the strike well to avoid skidding on a neighboring tile or on the taps. When the tile and its joint are free, remove the remains of the old glue. The new gluing requires an even surface.
Then dig out the thickness of mortar that still hides the pipe, in order to free it for about 5 cm.
Remove traces of mortar from the copper by sanding it with medium-grit abrasive (no. 80) then with emery cloth (no. 180), until the area around the leak shines.
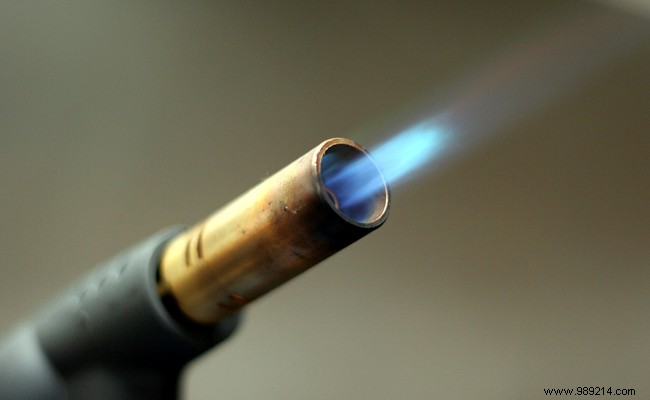
Apply a stripping fluid with a small brush which will facilitate the distribution of the filler metal. Heat the copper with a bi-gas torch. As soon as it takes on a cherry-red color, dip the brazing rod (a brass-based alloy) in a pickling paste. Gloved hand. Point it without removing the flame, so that it spins inside the hole.
Work fast as the solder may fail if overheated. Allow to cool, then turn on the water to test the watertightness.
Mix a small quantity of pre-measured repair mortar, of flexible and homogeneous consistency. Wet the masonry, so that it does not absorb the mixing water, and fill the cavity with mortar with a narrow spatula, until it is flush with the wall.
After 24 hours of drying, apply a ready-to-use tile adhesive to the wall with a notched trowel. Its layer should be a little thicker than that visible under the neighboring elements. Place the new tile and hammer it in with a rubber mallet. Check its flatness and alignment with the others, using a small ruler.
The next day, apply a joint mortar by forming circular movements with a flexible squeegee. Clean the excess, then smooth with the sponge. If you are not a DIY expert, find simple advice on ctendance to help you in your daily tasks.
Remember to purge the circuit by opening all the faucets in the bathroom. Otherwise, the solder will not take.
After laying a tiling, remember to keep a few items that could, like here, be of use to you one day.
Indispensable to stop drilling at random, use a metal detector to locate metal pipes, live cables and also to locate an originally invisible pipe