If you're anything like us, you probably own all kinds of smart home lights, gadgets, and other accessories. While there are plenty of Philips Hue alternatives out there, Philips Hue is still one of the best smart lighting kits out there.
Whether you've connected Hue to Apple Homekit, set up automations, or just upgraded Hue, there are still plenty of updates you can do.
Today I'm going to show you how to set up the Philips Hue motion sensor and some of its best uses. Let's get started!
Philips Hue Motion Sensor for Smart Lights (No Installation, Smart Home, Exclusively for Philips Hue Smart Light Bulbs) Philips Hue Motion Sensor for Smart Lights (No Installation, Smart Home, Exclusively for Philips Hue Smart Light Bulbs) Buy Now On Amazon $27.19
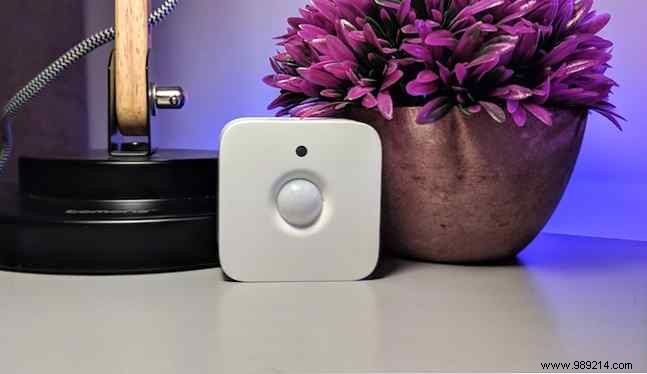
Once you've purchased your Hue motion sensor, it's easy to set it up. In terms of hardware, all you need to do is open the case and remove the plastic tab to connect the battery. You can place it on the floor or on a shelf, or you can attach it to a wall with the included bracket. It only takes one screw to do it.
You will need to place your motion sensor in a suitable location. This can be on a low level in the hallway, or at the top of the room in a bedroom, for example. Wherever you place your sensor, pay attention to where it points and think about what movements (human or animal) will or will not trigger your lights!
Setting up your motion sensor is a simple process from the Hue app.
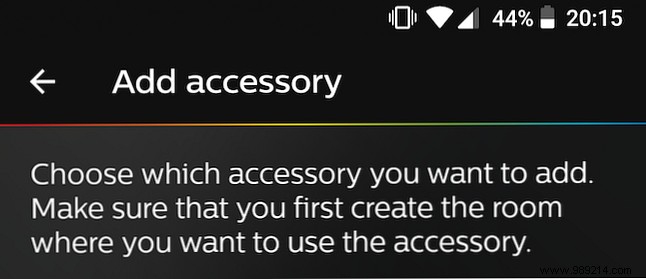
Start by pressing Settings cog at the top right of the app. Scroll down to Accessory Settings , and choosing the Add accessory button at the bottom right.
From this menu, choose Pitch Motion Sensor . The Add sensor The page will give you some basic installation instructions, but you're done! You should now have a blinking orange LED on the front of the sensor. Select the Blinking LED Button to start the pairing process. If this LED is not flashing, scroll down to the solution below.
Once paired, follow the on-screen instructions to choose which room and lights this sensor will control. It's possible to change this later, so don't worry about making a mistake.
If you don't have a blinking light when you try to pair, there could be a number of reasons. Maybe you have connected the battery a long time ago and the sensor has gone to sleep. Maybe you bought your sensor second hand and it's still paired with the previous owner's system. Whatever the reason, the solution is the same.
Using a small pin or paper clip, locate the Prepare Button on the back of the unit. This is a small hole at the top, labeled "prepare." Use your DIY tool to briefly press the hidden button inside this hole. You have just reset your sensor and your LED should start flashing again.
If you yet refuses to work, you may need to change the batteries. The Hue sensor takes two AAA batteries, which should last two to three years. Use a small screwdriver to remove the back cover, change the batteries, and then reseal the unit. You may need to reboot the device again.
Once you've set up your sensor, it's a simple process to adjust settings and set up automation.
From the above. Settings menu, choose Accessory settings . You should now see your sensor listed along with any other accessories you may have. From here, you can use the activation button to the right of the sensor input to enable or disable this sensor. You may want to disable it if you have a party or guests, depending on your uses.
After selecting your sensor, you will be taken to the Configure sensor page. This is where you can really adjust, tweak and customize your pitch sensor automations.
The first entry is a sensor name. This is particularly useful if you have multiple sensors.
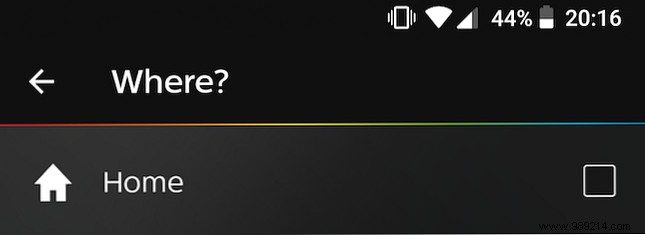
Next is the Where button, this is where you can choose which room is affected by this sensor. You cannot choose specific lights from this setup, nor can you choose more than three rooms. This is to ensure that the sensor responds quickly to any movement.
Under the subheading When motion is detected , you can adjust what you want to happen when you move and activate the sensor. Using the Day and Night With the time sliders, you can create two different time intervals (one for day and one for night). It's not possible to overlay times on these, so changing one slider affects the opposite.
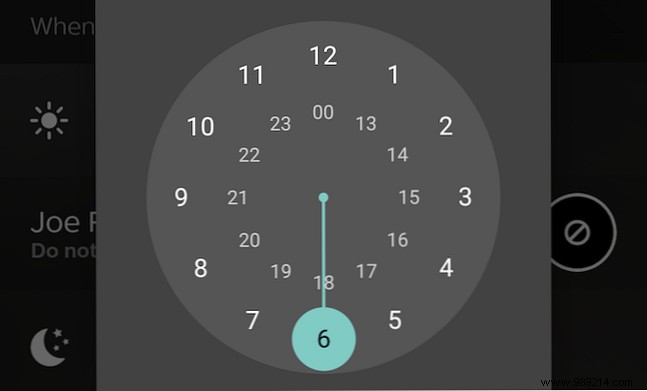
Below each time picker is an action. Here you can choose which scene to trigger when motion is detected. You can also set Hue to do nothing, which may be preferable for certain situations.
A neat trick here is to enable a very dim nightlight during the night hours, a setting that's particularly useful if you have small children.
Under the subtitle of When there is no movement , You can choose what to do when the lights are on but no one is around anymore. the After The button allows you to choose a duration between one and sixty minutes, but this is limited to predefined options.
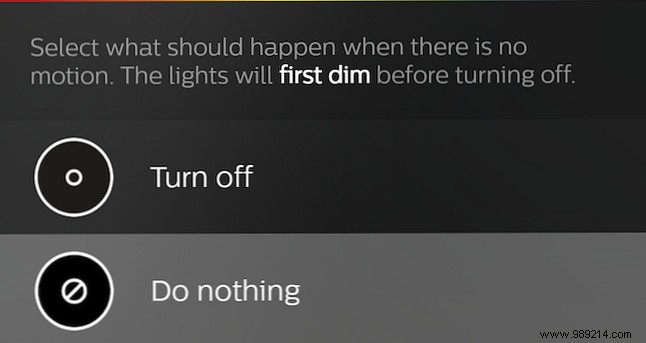
Below this back button is the name of the room the sensor is connected to. Select this to choose what to do after a while without movement. Your options are slightly limited here. You can choose Do nothing , or Power off .
Our final subtitle is titled. Advanced Options . Select the Daylight Sensitivity and then move the slider up or down to adjust the sensitivity of the sensor during bright light. This depends on the available light conditions, which can change throughout the day.
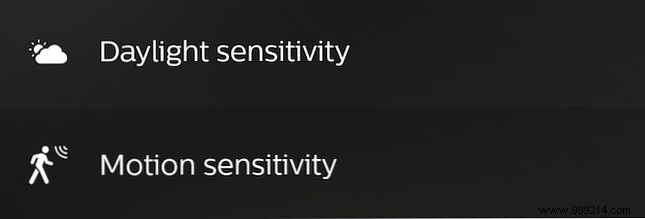
The Motion Sensitivity The button provides a way to customize the sensitivity of the movement to the sensor. You can choose Low , Medium , or High here. Higher settings mean smaller movements will trigger the sensor. Lower settings mean much larger moves are required.
The last two buttons are Restart and Delete . You'll probably only want to use them if you're moving your sensor to a new location or no longer own it.
While the Philips Hue motion sensor is a great device, it does have some limitations. It is not possible to configure several different actions depending on the time of day, only day or night. You can't choose individual bulbs, only rooms. You cannot set the sensor to ignore motion if the lights have been manually turned on.
Despite these limitations, the Hue motion sensor is still a great device, and you should buy one if you own any Philips Hue bulbs.
If you have the skills, you've considered creating your own Hue motion sensor How to control Philips Hue lights from an Arduino (and add a motion sensor) How to control Philips Hue lights from an Arduino (and add a sensor Sensor) Today I'm going to show you how to control tone lights from an Arduino and then add a simple motion sensor. Read more ? While challenging, the DIY approach can really save you some money if you need a large number of sensors.