sewable cardstock
Matching pink plaid, pink floral and cream floral patterned paper.
green embroidery thread (2')
cream 1/2" silk ribbon (1' for each daisy)
heart shaped charm
craft needle with a big eye
Archival quality tape or adhesive
Download the "He loves me, he loves me not" template.
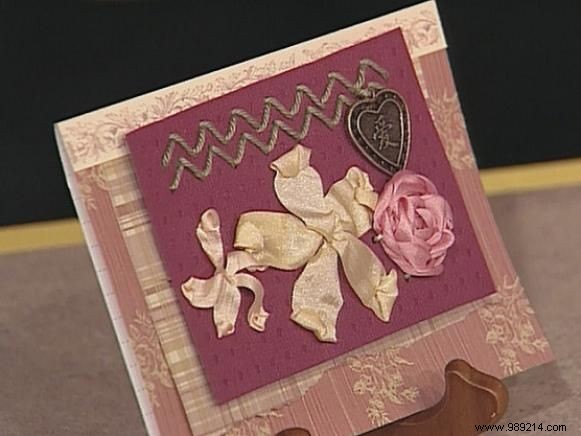
1. For the card, cut pink floral print paper (#1) to 8" x 5-3/4". Fold down to a 4" x 5-3/4" card.
2. Cut the pink checkered patterned paper (#2) to 5" x 4". Tear off the edge of one side 5". Adhere this to the front of the card.
3. Cut a 1/2" x 5-3/4" strip from the cream floral design paper.
4. Cut a piece of Stitchable cardstock to 4-1/4" x 2-3/4".
5. Draw the desired design on the back of the Stitchable cardstock. (See template). Use a needle to pierce the holes. Pre-punched cardstock lines things up for you and makes it so much easier.
6. Using dental floss, create the five-point star.
7. To create a rose, cut 1' of silk ribbon. Tape the end of the ribbon to the back of the Stitchable cardstock.
8. Pull the ribbon up through the center hole of the star pattern, which was drawn on the Stitchable cardstock. Insert the needle into the center of the tape at the desired length and continue to pull towards the back of the paper, leaving it very loose. Move the needle under one loop of the star and into the next loop. Continue this procedure until you have wrapped around the thread seven or more times. Tip: By twisting the ribbon, an extra dimension can be added.
9. To create daisies, it's a simple stitch. Bring the ribbon to the middle of what will be your flower. Take the needle and tape back through the hole and pull it through. Repeat this procedure for all the daisy petals.
10. For the zigzag border, cut two feet of green embroidery floss. Adhere the end to the back of the Stitchable cardstock.
11. Sew thread in a zigzag pattern, according to the template, on top of the Stitchable cardstock. Repeat to form two rows.
12. When you're done, adhere the end of the floss to the back of the Stitchable cardstock.
13. With a charm of your choice, sew the charm onto Stitchable card stock.
Diane Swain project.