By Lucie Rowe
Repurpose vintage silver forks into a stylish bracelet with this straightforward metalworking project. Ideal for beginners, it builds essential skills while creating a standout wardrobe accessory.
(2) silver forks
Rotary tool with metal cutting disc, sanding disc, and wire brush
Safety glasses and gloves
Screw
Propane torch
Heat-resistant work surface
Tongue-and-groove or slip-joint pliers
Needle-nose pliers
Jump rings, swivels, and lobster clasps
Safety Alert: Never use gold-plated flatware instead of silver-plated. Gold plating can disintegrate or explode when heated.
1. Identify the cut point on the fork handle – ideally a natural taper, decorative ring, or about 1 inch below the tines.
2. Secure the fork end in a vise. Wear gloves and safety glasses, then cut the handle using a rotary tool with a metal cutting disc (or a hacksaw). Safety Alert: Always protect your eyes and hands when cutting metal. Freshly cut edges are extremely hot – don't touch.
3. Release the fork with pliers and set aside. Repeat for the second fork.
4. Lay both cut forks tines-down on a heat-resistant surface like cement board, concrete, or metal.
5. Heat the forks evenly with a propane torch, keeping the flame moving about 2 inches away until cherry red. This softens the metal for bending. Safety Alert: Use eye protection and gloves. Never handle hot forks or torch tips. Observe all fire safety rules and keep children/pets away.
6. Allow natural cooling to room temperature – no ice or water quenching. Minor discoloration is normal and will be polished out.
7. Once cool, secure the fork tines-down in the vise, front facing you.
8. Tape the plier jaws to protect the silver. Grip the handle remnant and gradually bend toward you to form the bracelet curve. Check fit periodically by removing from vise.
9. Shape the second fork identically.
10. Vise one fork with bend outward, securing just 1 inch of tines.
11. With taped pliers, bend tines base toward you at about 90 degrees. Repeat for the other.
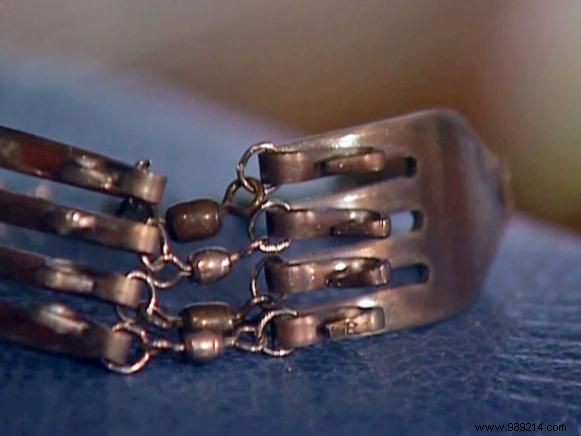
12. Use needle-nose pliers to curl tine tips into loops.
13. Polish away heat discoloration with a rotary tool and wire brush wheel.
14. Thread jump rings onto tines, linking forks with additional rings or swivels. Solder rings closed to withstand bracelet weight.
15. Alternatively, interlace tines directly. Align forks, insert a spare heated-and-cooled tine as a rivet, then twist ends to secure without snagging.
16. Drill holes in handle ends, add jump rings and swivels, then attach a lobster clasp. For a cuff style, adjust curves to fit wrist snugly without clasp.