OpenHAB is a mature, open source home automation platform that runs on a variety of hardware and is protocol agnostic, meaning it can connect to almost any home automation hardware on the market today. If you're frustrated with the number of manufacturer-specific apps you need to control your lights, then I've got great news for you:OpenHAB is the solution you've been looking for, it's the most flexible smart home. hub Which Smart Hub for home automation is best for you? Which Smart Hub for Home Automation is Best for You? For a while, people thought the idea was nothing more than a gimmick, but recent product launches have shown that smart home automation is starting to deliver on its promises. Read More This guide is available to download as a free PDF. Download Get started with OpenHAB Home Automation on Raspberry Pi now . Feel free to copy and share this with your friends and family.
Unfortunately, that's about as far as you can get from consumer friendly, but as always, that's where MakeUseOf comes in:We'll show you how to get up and running with the best smart home system that money doesn't need to buy (because OpenHAB is 100% free - only supplies the hardware).
The first part of this guide focuses specifically on how to set up OpenHAB with a Raspberry Pi 2, but later on, the tutorials and tips can be applied anywhere OpenHAB is installed.
This guide covers three introductory topics and a little more advanced.
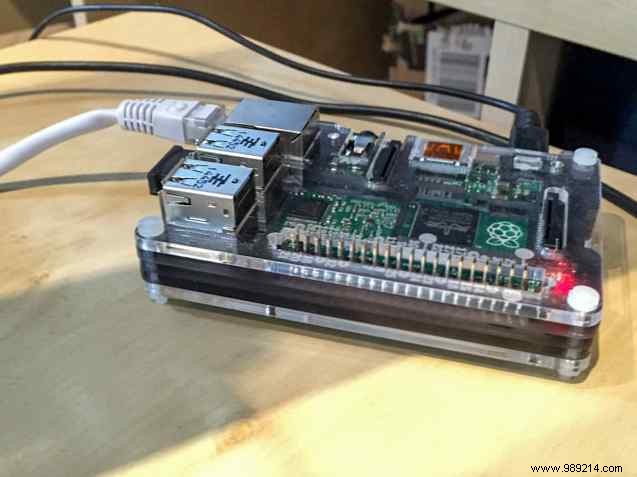
At a minimum, you will need a Raspberry Pi (preferably v2) and an Ethernet or wireless adapter (preferably Ethernet, this guide will not include instructions on how to get your Wi-Fi adapter working. Setting up wireless networks on your Raspberry Pi Setting up networks Wireless on Your Raspberry Pi Virtually all Raspberry Pi projects will require a network connection, and considerable flexibility can be gained by bypassing the Ethernet port in favor of a wireless USB dongle (Read More). Everything else is optional. Note that OpenHAB will also run on the original Raspberry Pi, but there is a known issue with slower processing and Z-Wave devices. If you don't need Z-Wave, you can ignore this warning and go ahead with a Raspberry Pi Model B or B+, because everything else seems to work fine. You can always upgrade to the latest Pi if and when you add Z-Wave.
At the time of writing, the latest stable version of OpenHAB is version 1.71; version 1.8 is expected soon, and everything in this guide should still be relevant, although certain links may have more features. Version 2 is also currently available as a very early alpha preview, but it adopts a very different architecture than the OpenHAB 1 series - this guide is not compatible with version 2.
I suggest you follow this guide slowly and methodically. - Don't try to jump into the deep end and add everything at once. Yes, it's a long guide:OpenHAB is a difficult system that often requires tweaking for your needs, and the best way to ensure success is to work slowly and complete one piece at a time.
The good news is that once it's up and running, it's a solid and incredibly rewarding experience.
There is no preconfigured image for OpenHAB, so installation is done the old-fashioned way via a command line. I suggest you work headless on the RPi - the overhead of managing a GUI that you'll rarely use isn't worth it.
Start with the latest (full) Raspbian SD image (not the “lite” version, these do not include the Java Virtual Machine). Plug in your network cable, then boot up and browse via SSH. Running:
sudo raspi-configExpand the file system; and from the advanced menu, change the memory division to 16. When done, reboot and, as a good practice, run a full update
sudo apt-get update sudo apt-get upgradeThe easiest way to install the OpenHAB runtime is via apt-get , but first we need to add a secure key and the new repository:
wget -qO - 'https://bintray.com/user/downloadSubjectPublicKey?username=openhab' | sudo apt-key add - echo "deb http://dl.bintray.com/openhab/apt-repo estable main" | sudo tee /etc/apt/sources.list.d/openhab.list sudo apt-get update sudo apt-get install openhab-runtime sudo update-rc.d openhab defaultsInterestingly, everything was installed as a "root" property. We need to fix that with the following commands.
sudo chown -hR openhab: openhab / etc / openhab sudo chown -hR openhab: openhab / usr / share / openhabNext, we will install Samba and share the configuration and user folders. This will make it easy to install plugins and change the sitemap remotely.
sudo apt-get install samba samba-common-bin sudo nano /etc/samba/smb.confChange the workgroup name if necessary, but enable WINS support otherwise:
gana soporte = si(you will need to uncomment the line and change no to yes)
then add the following to the share definitions section (scroll to the end of the long file):
[OpenHAB Home] comment = OpenHAB Home path = / usr / share / openhab browseable = Yes se puede escribir = Sí solo guest = no create mask = 0777 directory mask = 0777 public = no [OpenHAB Config] comment = OpenHAB Site Config path = / etc / openhab browseable = Sí se puede escribir = Sí solo guest = no create mask = 0777 directory mask = 0777 public = noI also commented in the Printers section. I've made two shares, since configuration files are actually stored separately from plugins.
Save and exit. Finally we need to set a Samba password for the openhab user:
sudo smbpasswd -un openhabI would suggest "openhab" as the password just for ease of use, but it doesn't really matter.
Thanks to reader David L, it seems that the Samba reboot method has changed in the latest Raspian. Here are the updated instructions:
sudo update-rc.d smbd habilita sudo update-rc.d nmbd habilita sudo service smbd restartAfter Samba restart (older installations use sudo samba restart service ), test you can access the shared drive. It may not be auto-discovered on a Mac; but you can use the Discoverer -> Go -> Connect to server and the address
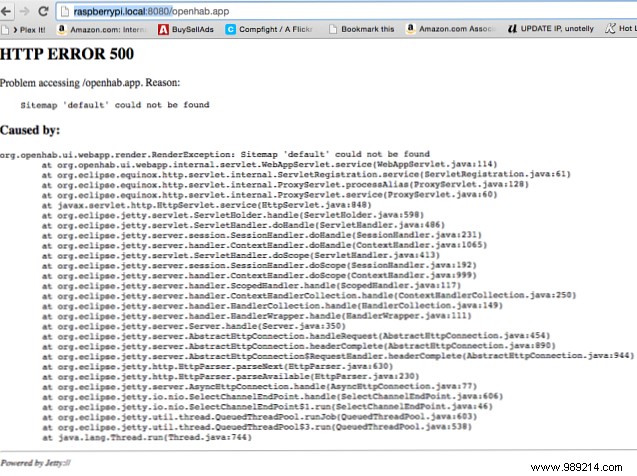
smb: //[email protected]Authenticate with the openhab username and your chosen password, then open both shares to take a look. You should even be able to open http://raspberrypi.local:8080/ in your web browser, but you'll get an error because we haven't created a sitemap yet. That's normal.
Now would be a good time to learn OpenHAB's log tracking command so you can keep an eye on errors.
cola -f /var/log/openhab/openhab.logKeep it running and open it in a separate SSH window at all times as you continue through the guide.
Before we delve into the intricacies of configuration files, adding devices and bindings, etc. Let's check that everything is working by adding the demo content. You will find “Demo Setup” in the download section of OpenHAB.org.
Once you have unzipped it, there are two folders:addons and settings .
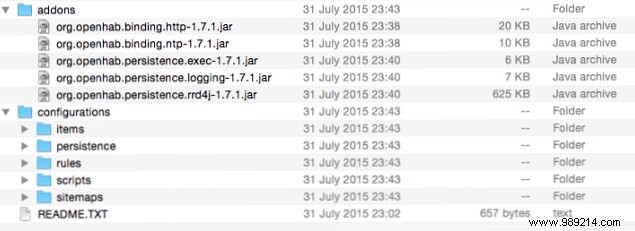
Using network shares, copy settings to OpenHAB Config share and overwrite the existing folder. Copy addons for the other OpenHAB Home share, again, overwriting existing folders. If you're not prompted to overwrite something, you're doing it wrong. If you keep an eye on the debug log file, you should see a flurry of activity as it notices the new links and buzzes into action. Open raspberrypi.local:8080/openhab.app? Sitemap =demo to see the demo.
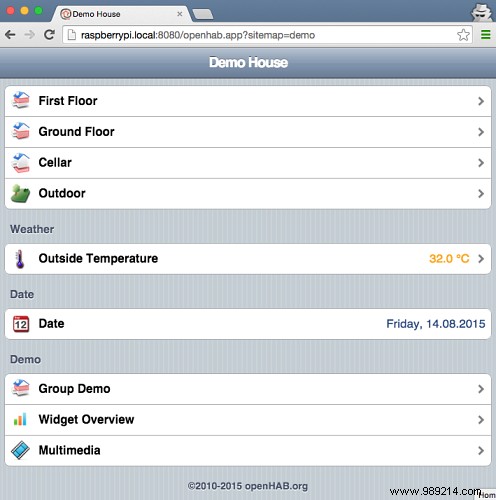
It's a bit basic at the moment, but the open nature of OpenHAB means we can install a lovely new theme later or an alternate interface altogether. For now, we just need to know that everything is working. Please note that what we are looking at is called a sitemap (nothing to do with a website map). A sitemap describes the user interface, not the actual devices on your network or sensors, just the interface to view them. Every part of it is fully customizable. To see how it was created, open the sitemaps / demo.sitemap file in the OpenHAB configuration.
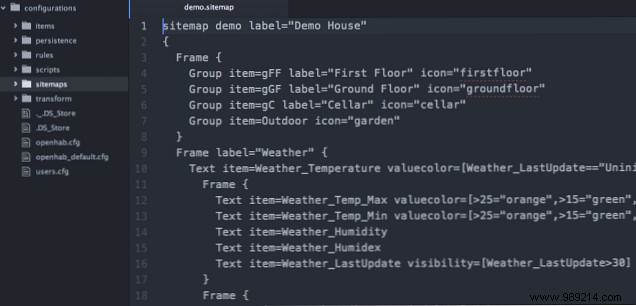
It's pretty daunting, but for the most part you'll be copying and pasting sample code snippets elsewhere to create your own custom interface. Here is the technical description of all the possible sitemap elements, but for now it will be enough just to start thinking about what kind of interface you want to build and what information you want to display.
While you're there, open items/demo.items also. Again, it looks scary, but this is where you create elements to control and define sensors to track.
Now that you've skimmed through the sitemap and the items folder, let's break down exactly what these files are and the other main components of OpenHAB that combine to create your complete smart home. You will find subdirectories for each of these in the OpenHAB Config shared folder.
Articles it is an inventory of every control device, sensor, or piece of information you want in your system. It doesn't have to be a physical device, either:you can define a web feed like weather or stock prices. Each element can be named, assigned multiple groups (or none at all), and connected to a specific link. (Beginner Tip:Capitalization is important when it comes to bindings. I spent a lot of time trying to figure out why my "Tint" bulbs weren't working; it was because they should have been "Tint" instead.)
Sitemaps it only cares about the interface you will see when you open the OpenHAB web or mobile app. You can precisely control how you want the buttons and information presented to be laid out. You could define top level groups for each room in your house; Clicking on each of them will display a list of all the devices in that room. Or perhaps you prefer to display groups for each type of device:one button for lights and another for outlets. There may be some devices that you use so often that you just want a switch for them right on the home screen.
Rules This is where the home automation aspect comes into play, where you can define times or conditions for an action to occur. Simple events like turning on the bedroom lights at 10 p.m. M. To a warm red color; or more complex logic like turning on a space heater if the temperature is below 0 and someone is present in that room. You will also find a hyphens folder, which offers functionality similar to rules but at a more complex level of programmable logic.
Persistence it's an advanced topic that we won't cover in this guide, but persistence defines the data you want to keep track of. By default, OpenHAB will only display the current state of something; If you want to track that value over time, you need to set up a persistence definition for that data source. In this, you'll specify things like how often a data point should be measured or when to discard old data points. It should also tell you what kind of persistence engine to use, such as MySQL or simple logging to a file.
Transform Contains mappings for data values to labels. For example, the humidex.scala The file defines a range of wetness index values and how they should be displayed in English:29-38 is “some discomfort”.
the site map and articles the files are essential for OpenHAB to run; the rest are optional. You can have multiple sitemaps and elements, so you can keep the demo content and come back to it at any time, or try a new design for your home control interface. Don't worry if this all seems a bit overwhelming right now, we'll break it down into manageable chunks and I promise that by the end of this guide, you'll be confident in creating your own OpenHAB setup.
Next, we'll walk you through adding a common smart home kit, starting from scratch on a new sitemap. Each one will introduce some basic concepts, such as link installation and element definitions, so I recommend that you read through these instructions. even if you don't own those particular devices .
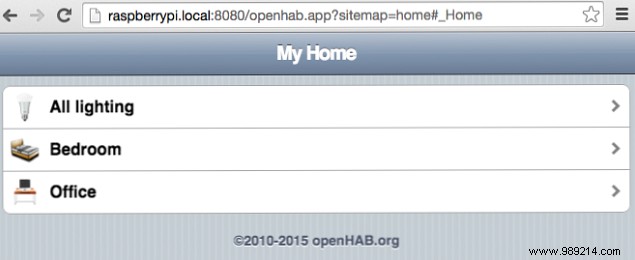
Start by creating a new (blank) home.items file, and a new home.sitemap file in the relevant directories. Open home.sitemap and paste in the following code. This just acts as a basic skeleton that we'll add bits to later.
sitemap home label = "My Home" You should see a notice that OpenHAB has identified a new sitemap and item file.

While you're still trying to get OpenHAB to work properly, it can be useful to enable more detailed debug logging that includes everything, and not just the important stuff. To enable this mode, open the OpenHAB Config shared folder and edit the logback.xml . On line 40, change the following line to read DEBUG instead of INFO. You will have to reboot after changing this.
This is a global change, so you'll get a lot more information once you've followed the log file.
I'm going to start with Philips Hue. As with most things you'll want to interact with in OpenHAB, Hue bulbs require you to install a Join - Think of links as a device driver. At the time of writing, there are around 160 bindings available for OpenHAB 1, which is why OpenHAB is such a powerful system:it can interface with anything, combining all those disparate control systems into a single, unified interface. Here's a demo and a quick overview of the steps involved.
The links must be downloaded first, and the easiest way to do this on the Pi is to use apt-get , then force the property to the open user.
sudo apt-get install openhab-addon-binding-hue sudo chown -hR openhab: openhab / usr / share / openhabNext, you need to tell OpenHAB to load that link and set the necessary variables. Go to the settings folder and make a copy of openhab-default.cfg , name it openhab.cfg . Open that, search for NUANCE and replace the entire section with the following code. The only thing you need to change is the IP value of your bridge - if you don't already know, try the online discovery tool. The secret value doesn't really matter, it's just some kind of username that OpenHAB will use to identify itself to the bridge.
Quick Tip :To enable a line, just remove the # from the beginning. By default, the line that specifies the IP address of the bridge is disabled (or technically, “Commented Out”). Also, if you're trying out an alternate configuration, it can be helpful to just copy the existing line and put a # at the beginning to mark it as a comment, so you can easily revert if things go wrong.
################################ HUE Binding ################ ########################## IP del tono Hue bridge: ip = 192.168.1.216 hue: secret = makeuseofdotcom hue: refresh = 10000
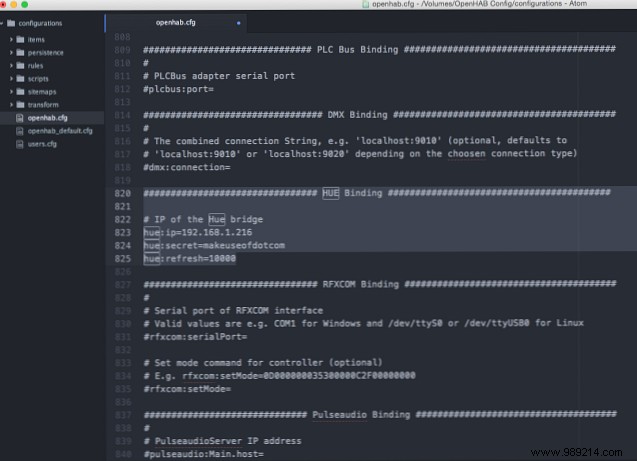
Save and exit. Like any third-party Hue app, you'll need to approve OpenHAB on the Hue Bridge by pressing the button on the front, you only need to do it once. You will see a message about waiting to be matched if you're following the log file, but forgot or missed the countdown, just restart the Pi - you'll get a 100 second timer from the start of the Hue pairing. Please make sure you have successfully paired before continuing.
Next, open the home.items File, to which we will add a few tone bulbs. Here is an example element definition:
Color Dormitorio_Hue "Dormitorio Hue" (Dormitorio) hue = "1" I've added a total of four light bulbs, as well as a simple declaration of the groups that we'll expand on later. Here is my complete home.items at this point:
Grupo Dormitorio Dormitorio Oficina Grupo Kai Grupo Living_Room Grupo Cine Grupo SecretoLuces de grupo/ * Luces * / Color Dormitorio_Hue "Dormitorio Hue" (Dormitorio, luces) hue = "1" Color Office_Hue "Office Hue" (Oficina, Luces) hue = "2" Color Secret_Hue "Tono secreto" (Secreto, luces) hue = "3" Color Kai_Hue "Tono de Kai" (Kai, luces) hue = "4" The /*Lights*/ the text is just a comment, it has no other function to help us parse the file later when it is bigger. Now we have added the devices, but open http://raspberrypi.local:8080/? Sitemap =home results in a blank frontend, of course, because we haven't created any frontend elements in the sitemap yet. Let's start really simple for now. Open home.sitemap .
The code used to describe the interface is different than the elements, but for now we'll create a new “box” and add a couple of group controls along with some icons.
sitemap home label = "Mi hogar" Marco Elemento de grupo = Luces etiqueta = "Todo iluminación" icon = "color" Elemento de grupo = Dormitorio etiqueta = "Dormitorio" icon = "dormitorio" Elemento de grupo = Oficina etiqueta = "Oficina" = "escritorio"Groups are a useful tool for quick tests, but you'll actually want more control over how items are displayed. For now, this will suffice. Save and reload your home sitemap in the browser. You should see this (or any groups you've added).
Click All Lighting to see all the lights in Hue, since we have defined them as belonging to that group of general lights.
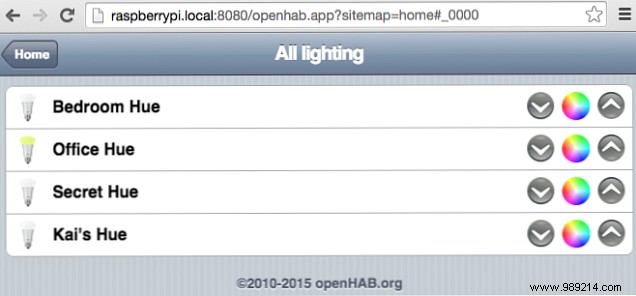
Notice that the Office Hue element is displayed with a different icon; that's because the light in my office is already on, and OpenHAB knows this when it spoke to the Hue bridge and was smart enough to set the icon to “on” Version of the file. Unfortunately, it doesn't reflect the color, but if you have a mobile app installed, that will reflect the current color.
If you see more items than you thought you had defined, or get errors about multiple definitions, please note that although you can only load one sitemap at a time on the page, all sitemaps will pull items from all .item files. , so if you've left the demo elements file there, it might also show some additional elements in your groups. At this point, I suggest backing up the content of the demo items and moving it out of the folder to avoid duplication errors.
Right now, you need to be on the same local network to access your OpenHAB system, but what if you want to control your devices and check sensors when you're out of Wi-Fi range? For that we will have to configure remote access, and we will do it in the easiest way, with the My.OpenHAB web service, which avoids the need to alter the configuration of routing and port forwarding. As a bonus, the My.OpenHAB service also has an IFTTT channel, giving you endless possibilities for remote control and automation.
First of all:install the link. Quick Tip:If you don't know the exact name of a particular installation package, try searching for it with apt-cache.

sudo apt-get install openhab-addon-io-myopenhab sudo chown -hR openhab: openhab / usr / share / openhabBefore you can register on the My.OpenHAB site, you will need to create a secret key and find your UUID, which uniquely identifies your installation. Check under the OpenHAB home share -> web applications -> static and it should find a UUID file containing your unique identifier. At this point I discovered that my Pi was using an older version of Java which doesn't correctly create the secret key. Type
java -versioncheck. If it doesn't say 1.7 or higher, you have the wrong version. Interestingly, the latest version of Raspbian comes with Oracle Java 8 installed, but not set as default.
sudo actualización-alternativas --config java
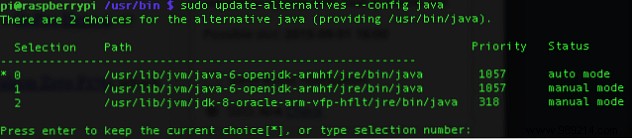
Choose the option it indicates. jdk-8-oracle , then restart OpenHAB. Bonus:Oracle Java 8 is faster than the default OpenJDK!
You should now also find a secret file in the web/static apps binder. Open both the secret and uuid , and get ready to copy paste.

Now go create a My.OpenHAB account, using those details, then come back, you'll also need to confirm your email before anything will work. There are a couple more steps to this one. First, we need to configure the default persistence engine in myopenhab (persistence is something for a later guide, but regardless, we need to configure something basic to "export" our data to the online service and make it visible to IFTTT). To do this, open openhab.cfg and find the variable that says persistence:default= and change it to persistence:default =myopenhab . Save.
Finally, create a new file in the settings / persistence folder named myopenhab.persist , and paste into the next rule.
Estrategias default = everyChange Items *: strategy = everyChange You don't need to understand this for now, but you should know that it says "Save each item's state when it changes."
To connect with IFTTT, head over to the OpenHAB channel; you will need to authenticate and give access to your MyOpenHAB account. Also note that until your items have changed at least once, they won't be visible in the item list in IFTTT, so if it's not visible, toggle something on and off, then reload. Congratulations, you now have full IFTTT access to everything on your OpenHAB system!

I recently showed you how to make an automatic office door lock using Bluetooth. Make an auto-locking office door with a proximity sensor for your smartphone. Make an auto-locking office door with a proximity sensor for your smartphone. We'll be setting up a Raspberry Pi with a Bluetooth adapter to watch for when your smartphone is out of range, and trigger a relay to lock the door. Read more Scanning for user presence - I wanted to introduce something like this in OpenHAB.
On any platform other than the Raspberry Pi, this would be simple thanks to a ready-made Bluetooth link; unfortunately it doesn't work on the Pi due to a crucial Java file that would have to be recompiled for the ARM architecture, added to the link, and then rebuild the link. Suffice to say I tried it, and it was horribly messy and didn't work. However, there is a much simpler solution that also serves as a good introduction to OpenHAB's extensive capabilities:we'll simply adapt our Python script above to report directly to OpenHAB's RESTful interface.
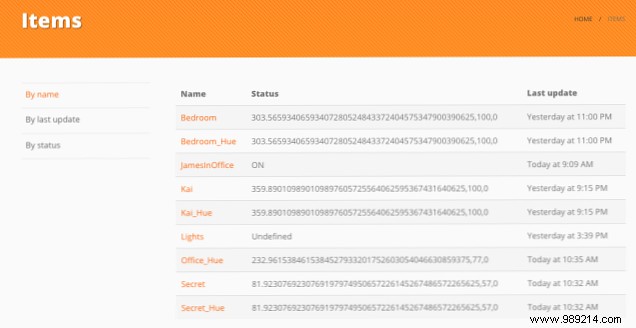
Aside:a REST interface means you can interact with a system using the embedded web server, simply by calling URLs and passing or fetching data. You can visit this URL to see a simple example of this on your own server:http://raspberrypi.local:8080/rest/items, which outputs an encoded list of all defined items. This is incredibly powerful as it exposes the full potential of OpenHAB and allows you to write custom interfaces; or in reverse used, to report the status of the sensors without having a specific link. We will use this capability to report the presence of a specific Bluetooth device without having to resort to the Bluetooth link.
Start by adding a new Change item to your home.items proceedings. I've named mine “JamesInOffice”, and made it a switch instead of a simple on/off contact so I can manually control my presence in case my phone dies.
Cambiar JamesInOffice "James en la oficina" (Oficina)Note that I have not defined an icon or associated a specific link. It's just a generic switch..
Next, insert a Bluetooth compatible USB adapter and install some basic tools to interact with it.
sudo apt-get install bluez python-bluez python-pip sudo pip solicitudes de instalación hcitool devThe last command should display your Bluetooth adapter. If there is nothing in the list, try another adapter, yours is not compatible with Linux. The next step is to find the Bluetooth hardware address of your device.
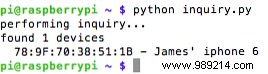
wget https://pybluez.googlecode.com/svn/trunk/examples/simple/inquiry.py python inquiry.pyMake sure your phone is open to the Bluetooth settings page (which puts it in public/pairing mode) and obviously Bluetooth is turned on. You should find a hexadecimal hardware address in the list.
From your Pi user's home directory, create a new Python script and paste in this code.
There are a few things you'll need to edit, starting with the address of your particular device:
resultado = bluetooth.lookup_name ('78: 7F: 70: 38: 51: 1B ', tiempo de espera = 5)As well as this line, which is in two places (yes, it could probably be structured better). Change JamesInOffice to the switch codename you defined.
r = requests.put ("http: // localhost: 8080 / rest / items / JamesInOffice / state", data = payload) The last step is to tell this script to start at boot time.
sudo nano /etc/rc.localScroll down to the bottom and just before output 0 add the following lines:
python /home/pi/detect.py &The ampersand means “do this in the background”. Go ahead and run the script if you haven't already, and open your OpenHAB interface. If you've added it to a group, click that group. The update takes about 10 seconds, but you'll see the default light bulb icon turn on or off depending on whether or not your phone was detected. Check the log file if nothing happens, you might have used the wrong article name.
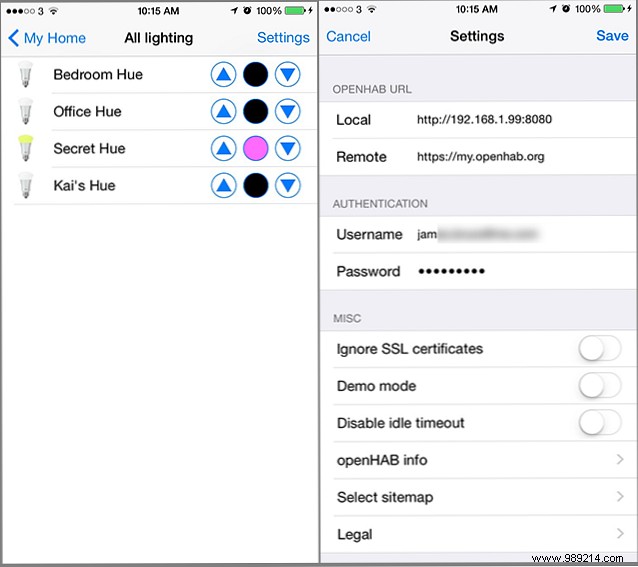
While you can of course use the web interface from a mobile device, OpenHAB has native apps for iOS and Android, and they look a lot better than the default browser interface. On the configuration screen, enter the local URL as the internal IP you have been using so far, including the port number. For remote URL, enter https://my.openhab.org , and your username (email) and password you entered when registering. If you haven't signed up for MyOpenHAB yet, leave the Authentication and Remote URL blank, but you'll only be able to access your system from your local Wi-Fi.
The amount of neat, custom features you can add to your OpenHAB controller is really kind of epic. Además de la amplia lista de dispositivos admitidos con enlaces, puede usar la interfaz REST, las extensiones HTTP y IFTTT para leer o controlar literalmente cualquier tipo de dispositivo IoT y, a continuación, algunos (pruebe algunas de nuestras ideas creativas de iluminación) 7 Usos creativos para la iluminación de automatización del hogar con LED de color 7 Usos creativos para la iluminación de automatización del hogar con LED de color Encender las luces automáticamente es genial, pero no aprovecha el espectro completo de colores disponibles con la iluminación RGB. Para eso, debemos ser creativos . Lee mas ). Sí, es una molestia absoluta para instalar, pero ni un solo sistema comercial puede acercarse a la potencia de un sistema OpenHAB personalizado.
Dicho esto, el viaje no fue nada fácil para mí, que es precisamente el motivo por el que escribí esta guía, para facilitarle el proceso. Y si encuentra que el sistema OpenHAB es abrumador, hay otras opciones cuando se trata de la automatización del hogar Raspberry, como usar Raspberry Pi para automatizar la puerta de su garaje Cómo automatizar la puerta de su garaje con IFTTT y Raspberry Pi Cómo automatizar la puerta de su garaje con IFTTT y Raspberry Pi En este tutorial, le mostraremos cómo automatizar la puerta de su garaje usando nada más que una Raspberry Pi e IFTTT. Leer más por ejemplo.
Manténgase sintonizado con MakeUseOf para obtener una guía avanzada que cubre Z-Wave y otros trucos geniales que puede configurar.
Si necesita ayuda con una parte específica de esta guía, pregunte en los comentarios. Si desea ayuda con otro enlace o algunos temas avanzados que aún no hemos cubierto, los foros oficiales de OpenHAB son un lugar acogedor.