Smart outlets are the easiest way to automate your home, but at around $40 each for a Wi-Fi or ZWave-based outlet, you're unlikely to buy more than a few.
However, you may already have some cheap RF based sockets, the kind that come with their own custom remote, and have some channel ID selectors on the back. Unfortunately, there are no smart home hubs on the market. Battle of the Smart Home Hubs:What's Out There and What's Next? Battle of the Smart Home Hubs:What's Out There and What's Next? Read More Wouldn't it be great if you could link them to your DIY smart home system somehow? Well, you can, very easily in fact, with about $10 worth of parts.
With a little more work, you can also integrate some other custom RF-based remote hardware, like this budget movie screen.
If this is your first time programming the NodeMCU board, you'll need to download the Arduino plugins for it:follow the first part of our introductory guide to Arduino Killer Meet Arduino Killer:ESP8266 Meet Arduino Killer:ESP8266 What If He Told You that there is an Arduino-compatible development board with built-in Wi-Fi for less than $10? Well, there is. Read More You will also need ch430 drivers . You can find the signed macOS CH430 drivers here, or Windows drivers here.
I have used v1.6.5 of the Arduino because any higher version has more problems than it solves. Downgrade if you haven't already.
Before I continue, I will assume a basic level of knowledge about Arduino programming. Arduino Programming for Beginners:The Traffic Light Controller Arduino Programming for Beginners:The Traffic Light Controller Last week, we learned about the basic structure of an Arduino program and took a closer look at the "blink" example. Hopefully you've taken the opportunity to experiment with the code, adjusting timing. This time,… Read More You should also have added the libraries included in our download to your Arduino / libraries folder.
If you have a PubSubClient or MQTT library , back up and delete it - the one I've included in the download is the only one where I can reliably receive messages on NodeMCU, and I tried a lot !
This step is not necessary if you only want to control the DIP switch or dial selector sockets; these are supported out of the box, and minimal code modification will be needed (this is still interesting to do first, so I understand what's going on behind the scenes).
If you have other RF remotes that you would like to try adding, you will first need to “sniff” the RF codes being transmitted. To do this, load the ReceiveDemo_Advanced sketch of the Menu -> Examples -> RCSwitch folder, and change the next line to 0
mySwitch.enableReceive (0); // Receptor en la interrupción 0 => que es el pin # 2to 2.
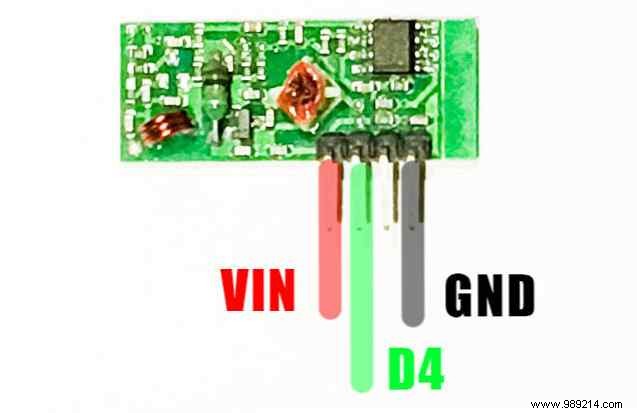
mySwitch.enableReceive (2); // Receptor en GPIO 2 / D4.Connect the receiver module as follows. Looking at the front of the receiver board (it's the longer of the two, the transmitter is square) - the side with the components on:
Now upload the modified ReceiveDemo_Advanced , and when you're done, open the serial monitor and start pressing buttons on your remotes. Copy the decimal (including bit length), pulse duration, and protocol when you press a button.
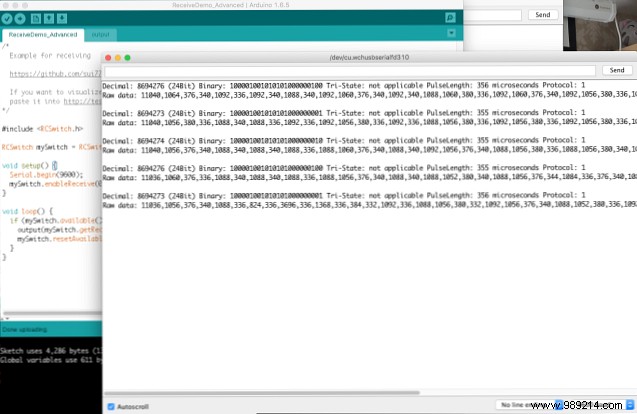
After doing this, I found that my projector screen was using
Continue for as many buttons as you need.
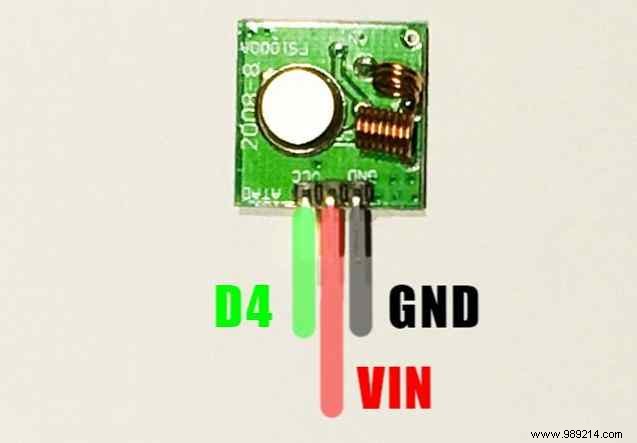
Next, we are going to try to send codes using the transmitter. Wire the transmitter module (the square one) as follows.Be careful:the labeling of these pins is atrocious. .
The VCC pin is in the center, not on the left side. I destroyed a module in the process of solving this. That thing that says “A LITTLE” is actually “DATA”, spelled backwards. Again, data goes to D4, VCC to VIN, and GND to GND (remove the receiver module, you don't need it anymore).
Load the Examples -> RCSwitch -> TypeB_WithRotaryOrSlidingSwitches , and again, change the data pin:
mySwitch.enableTransmit (10);to
mySwitch.enableTransmit (2);Note that a variety of examples are included in the library, and which one works for you will depend on the exact type of switch you have. Types A (DIP switches) and B (knobs or sliders) are the most common; please refer to the pictures on the RCSwitch page. For type B, turning a plug on and off is as simple as:
mySwitch.switchOn (1, 4); mySwitch.switchOff (1, 4);where 1 is the channel ID (the upper dial) and 4 is the socket ID (the lower dial). These were written in roman numerals on my sockets. Therefore, a maximum of 16 individual sockets can be addressed, although multiple sockets can use the same address if you have multiple devices to power on at once.
However, my projector screen was a bit different - it used a different pulse length. So to trade those, the following worked. Note that you can also define a different protocol if your remote needs it, BUT make sure you define the protocol BEFORE the pulse duration.The pulse length is overwritten when you change the protocol.
// Tenga en cuenta que mi pantalla realmente requiere DOS pulsaciones de botón (no una pulsación larga, sino dos pulsaciones físicas), por lo que estoy retrasando un poco y luego envío la misma señal de nuevo void screenUp () mySwitch.setPulseLength (358); mySwitch.send (8694273,24); // (código decimal, número de bits) retraso (2000); mySwitch.send (8694273,24); void screenDown () mySwitch.setPulseLength (358); mySwitch.send (8694276,24); retraso (2000); mySwitch.send (8694276,24); Test that all of your code works first before continuing to the next step.
Open the sketch you downloaded from Github called mqtt_rcswitch.ino , and start by modifying the network SSID and password for your home. Then change the channel name if you want and configure the MQTT server. If you don't already have an MQTT server running on your OpenHAB installation, read part 2 of our OpenHAB Beginners Guide OpenHAB Beginners Guide Part 2:ZWave, MQTT, Rules and Charts OpenHAB Beginners Guide Part 2:ZWave, MQTT, Rules and Graphs OpenHAB, the open source home automation software, far exceeds the capabilities of other home automation systems on the market, but it is not easy to configure. In fact, it can be downright frustrating. Read more . Note that my code is designed for type B (rotary switch) sockets, although you could easily modify it for DIP switches as well.
The most important part of the code is the received message() Function, which responds to incoming MQTT commands. In this function, we first check the main keyword, I chose “change” and “display”. In the case of "switch", we then parse the channel and socket ID; Next, check the payload body for the command.
void messageReceived (String topic, String payload, char * bytes, longitud int sin firmar) if (topic.indexOf ("switch")> = 0) // cambiar el control, analizar el canal y el id del conector int channel = getValue ( tema, '/', 3) .toInt (); int plug = getValue (topic, '/', 4) .toInt (); if (payload == "on") mySwitch.switchOn (canal, conector); else mySwitch.switchOff (canal, conector); else else if (topic.indexOf ("screen")> = 0) // control de pantalla si (payload == "up") screenUp (); else if (payload == "down") screenDown (); / * agregue otro más si está aquí para escuchar más comandos (o simplemente modifique el anterior si no desea la pantalla) * / By default then, the following MQTT commands work:
sala de estar / control / interruptor / X / Y (donde X es canal, e Y es ID de conexión; con el cuerpo del mensaje activado o desactivado)
sala / control / pantalla (con el cuerpo del mensaje arriba o abajo)
Use the command line or a GUI MQTT client to test your devices before adding them to OpenHAB.
As a last step, we just need to create some elements for these switches in OpenHAB. I've defined the following elements for now, but you should be able to figure out how to add more:
/ * Dispositivos RF433mHz * / Cambiar CinemaScreen "Screen" (Cinema) mqtt = "> [broker: livingroom / control / screen: command: ON: down],> [broker: livingroom / control / screen: command: OFF: up ] " Switch Switch41" Switch41 "(Cinema) mqtt ="> [broker: livingroom / control / switch / 4/1: comando: ON: on],> [broker: livingroom / control / switch / 4/1: comando: OFF: apagado] " Switch Switch42" Switch42 "(Cinema) mqtt ="> [broker: livingroom / control / switch / 4/2: command: ON: on],> [broker: livingroom / control / switch / 4/2: comando: APAGADO: apagado] "
You should now be able to control your RF devices from OpenHAB! One thing that pleasantly surprised me was the range:a single node was able to cover most of my house. You can of course add another node, listening to the same channel, that just repeats the same commands, if you need more coverage.
The only limitation to be aware of is that the sockets themselves cannot report their state, so if you use the original remote, the socket's state control may not be accurately reflected in OpenHAB. Keep using just the OpenHAB interface and you'll be fine.
Questions or problems? Ask in the comments, and I'll do my best to help you. . If you want to improve my code, feel free to submit a pull request.