Smart outlets are the simplest way to automate your home, but Wi-Fi or Z-Wave models often cost around $40 each, limiting how many you can afford.
That said, you might already own inexpensive RF-based sockets—the kind with custom remotes and channel selectors on the back. While no off-the-shelf smart home hubs support them directly, integrating them into your DIY setup like OpenHAB is straightforward and costs just $10 in parts. I've done this myself successfully.
With extra effort, you can even add other RF devices, like a budget projector screen.
If you're new to NodeMCU, install the Arduino ESP8266 plugins following the first part of our ESP8266 introductory guide. You'll also need CH340 drivers: macOS signed drivers here, Windows drivers here.
Stick with Arduino IDE v1.6.5—newer versions caused issues for me. Add the libraries from my GitHub download to your Arduino/libraries folder.
Remove any existing PubSubClient or MQTT library; the included one is the only reliable option I've tested extensively with NodeMCU.
Basic Arduino knowledge assumed—see our Arduino Programming for Beginners guide if needed.
Skip if using standard DIP-switch or rotary sockets (supported out-of-box). For custom remotes, sniff codes first.
Load Examples > RCSwitch > ReceiveDemo_Advanced. Change:
mySwitch.enableReceive(0);to:
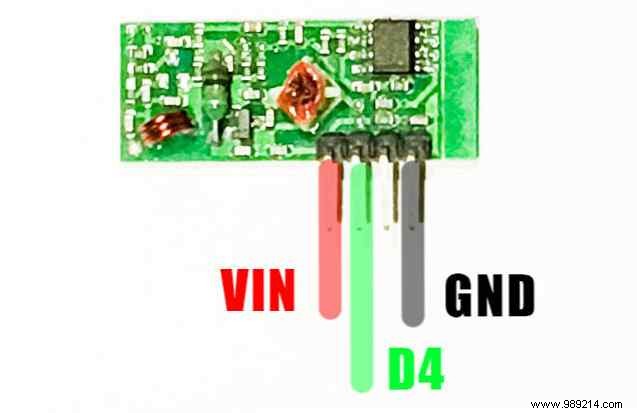
mySwitch.enableReceive(2); // Receiver on GPIO 2 / D4Wire the receiver (longer board, components facing you):
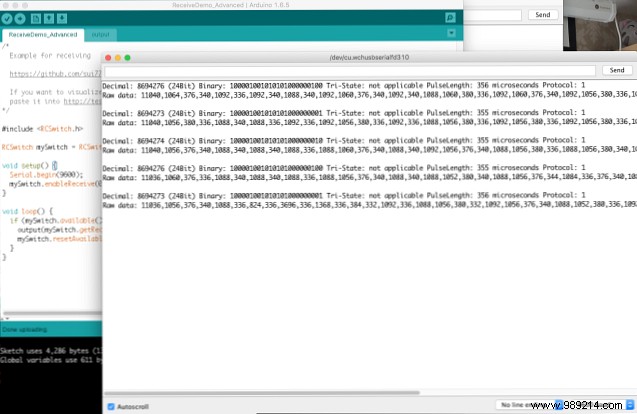
Upload, open Serial Monitor, press remote buttons. Note decimal code, bit length, pulse length, protocol.
For my projector screen:
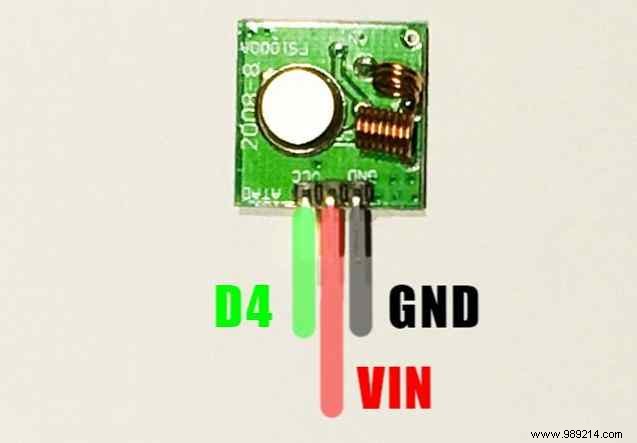
Wire the transmitter (square board): Pin labels are misleading! VCC is center; 'A LITTLE' is backwards 'DATA'. DATA to D4, VCC to VIN, GND to GND. (Disconnect receiver.)
Load Examples > RCSwitch > TypeB_WithRotaryOrSlidingSwitches. Change:
mySwitch.enableTransmit(10);to:
mySwitch.enableTransmit(2);For Type B (rotary/sliding) sockets:
mySwitch.switchOn(1, 4);
mySwitch.switchOff(1, 4);
1=channel (top dial), 4=socket (bottom dial). Up to 16 sockets.
For my screen (custom pulse):
// Note: Screen needs two presses
void screenUp() {
  mySwitch.setPulseLength(358);
  mySwitch.send(8694273, 24);
  delay(2000);
  mySwitch.send(8694273, 24);
}

void screenDown() {
  mySwitch.setPulseLength(358);
  mySwitch.send(8694276, 24);
  delay(2000);
  mySwitch.send(8694276, 24);
}
Set pulse before protocol to avoid overwriting. Test thoroughly.
Open mqtt_rcswitch.ino from GitHub. Update Wi-Fi SSID/password, MQTT server (see OpenHAB Beginners Guide Part 2 to set up MQTT in OpenHAB). Tuned for Type B sockets; adapt for DIP as needed.
Key: callback() handles MQTT:
void callback(String topic, String payload, ...) {
  if (topic.indexOf("switch") >= 0) {
    int channel = getValue(topic, '/', 3).toInt();
    int plug = getValue(topic, '/', 4).toInt();
    if (payload == "ON") mySwitch.switchOn(channel, plug);
    else mySwitch.switchOff(channel, plug);
  } else if (topic.indexOf("screen") >= 0) {
    if (payload == "UP") screenUp();
    else if (payload == "DOWN") screenDown();
  }
}
Commands:
livingroom/control/switch/X/Y (payload: ON/OFF)
livingroom/control/screen (payload: UP/DOWN)
Test with MQTT client before OpenHAB.
Add items:
Switch CinemaScreen "Screen" (Cinema) { mqtt="> [broker: livingroom/control/screen:command:ON:DOWN], > [broker: livingroom/control/screen:command:OFF:UP]" }
Switch Switch41 "Switch41" (Cinema) { mqtt="> [broker: livingroom/control/switch/4/1:command:ON:ON], > [broker: livingroom/control/switch/4/1:command:OFF:OFF]" }
Switch Switch42 "Switch42" (Cinema) { mqtt="> [broker: livingroom/control/switch/4/2:command:ON:ON], > [broker: livingroom/control/switch/4/2:command:OFF:OFF]" }
Control RF devices from OpenHAB! Range covered my house; add repeaters if needed. Sockets don't report state—avoid physical remote to keep sync.
Questions? Comment below—happy to help. Improve the code? Pull request welcome.