8" piece of solid color cotton fabric (match with your bead colors)
6" plastic embroidery hoop
Dritz Half Ball Buttons to Cover, #213-60, 1-1/2" (size 60)
Fabric feather
Short beading needle
Craft glue
Nymo D or Silamide beading thread to match fabric color
Seed beads in various colors and sizes (15, 11, 8)
1/8" bugle beads
Glass leaves and flowers, approximately 8x10mm
Small charms or other embellishments
Small scissors
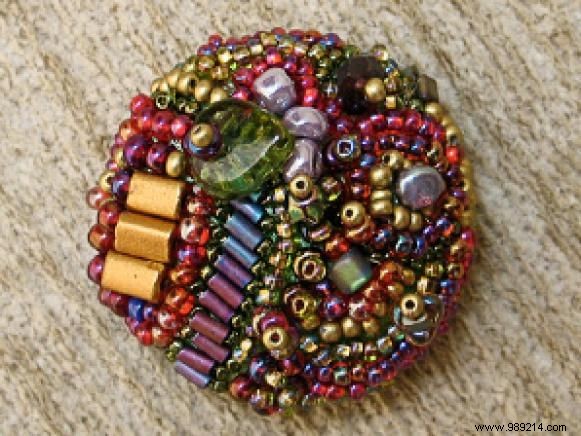
1. Stretch the fabric over the hoop and secure it taut but not overly tight.
2. Cut out the shape pattern from the back of the button pack and place it on the fabric.
3. Position the button front in the center of the circle and trace around it—this defines your beading zone.
4. Draw loose directional lines on the circle to guide your bead pattern.
5. Thread the needle and tie a knot at one end. Bring the needle up from the back of the fabric, add a large bead, and go back down through the front. This creates a seed point.
6. Bring the needle up right next to the large bead, add five size 11 beads, and lay them flat around the edge. Ensure they sit taut, then go down through the fabric at the end of the row.
7. For backstitching, bring the needle up to the center of that row and pass through two or three beads from the end. Avoid going back through the fabric here.
8. Add four or five more beads and continue encircling the central bead.
9. Keep circling and filling with beads, following your directional lines until the entire button surface is covered.
10. Remove the fabric from the hoop and trim the edges to the outer circle.
11. Apply a dot of glue to the button surface and center the beaded fabric over it. Allow to dry fully.
12. Assemble the button per package instructions, ensuring the molded area lies flat.
13. Cover any exposed raw edges with matching beads. Thread the needle, knot the end, bring it through a gap, and add beads using seed stitch or backstitch.
14. For added embellishments, string a short row of beads as fringe. Pass the needle through the entire row, using the last bead as an anchor, then go back through the fabric and pull securely.
15. Exit at another point and repeat for as many fringes as desired.
Note: When using bugle beads, always add a seed bead at each end to prevent sharp edges from cutting the thread.
Copyright © 2006 Myra Wood (www.myrawood.com)