Damp issues plague many homes and can be incredibly frustrating. Pinpointing the problem is often challenging, and achieving a lasting fix even more so. As seasoned home improvement specialists, we've helped countless homeowners resolve these issues effectively. Here's our proven step-by-step guide.
Step 1: Spot the Signs of Dampness in Your Home
In France, nearly one in five households battles humidity problems, but recognizing the symptoms isn't always straightforward. Dampness reveals itself through various indicators, sometimes singly or in combination.
If you notice any of these telltale signs, your home likely has a damp issue:
- Visible and tactile moisture on walls;
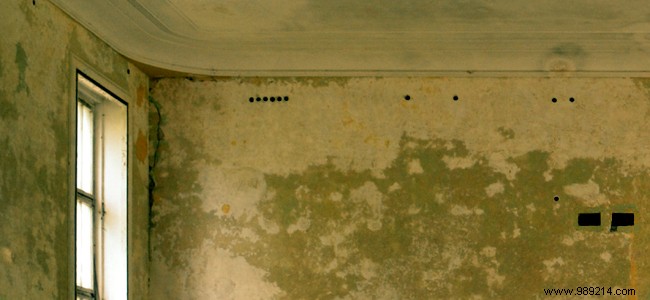
- Damp stains or halos on walls, ceilings, and/or floors;
- Mold growth on lower wall sections, corners, door frames, and window edges;
- Peeling, blistering, or warping plaster, wallpaper, murals, or paneling;
- Saltpeter efflorescence appearing as whitish foam on surfaces;
- Musty odors or visible mold in rooms.
Step 2: Diagnose the Root Causes of Dampness
Don't rush into surface treatments—first, identify the source. Treating symptoms alone is futile, much like masking an illness without addressing its cause. A logical diagnosis saves time, money, and frustration.
Common Causes of Interior Dampness:
- Poor or inadequate ventilation: Trapped humidity leads to condensation, stains, and mold when air doesn't circulate properly.
- External water infiltration: Cracked door/window frames, loose roof tiles, or degraded facade seals allow water to seep into walls.
- Capillary action: Groundwater rises through poorly designed foundations.
- Plumbing leaks: These can saturate walls over time.
When unsure, consult a certified professional for accurate diagnosis and tailored advice.
Step 3: Eliminate the Dampness at Its Source
Always treat the origin before cosmetic repairs—it's non-negotiable for long-term success.
Tailored solutions depend on the cause:
- For poor ventilation, upgrade to a properly sized VMC (mechanical ventilation system). Regularly service it, and air out rooms daily for at least 5 minutes, especially kitchens and bathrooms.
- For infiltrations, seal cracks, repair facades, and replace inefficient doors/windows. Exterior wall insulation prevents future issues.
- To combat capillary rise, inject resin, install drainage, and apply waterproof membranes to sanitize foundations.
- For leaks, repair pipes immediately—delays worsen saturation.
Step 4: Prepare and Redecorate Once Dry
With the source fixed, patience is key: allow walls, ceilings, and floors to dry fully—days to weeks, depending on severity.
Rushing risks recurring damage as trapped moisture escapes. Once bone-dry:
- Scrub surfaces thoroughly to remove mold, stains, and bacteria, ensuring a clean base.
- Replace irreparably damaged materials like swollen plaster, wood, or tiles.
- Optionally, apply water-repellent treatments for added protection.
- Install finishes: paint, wallpaper, paneling, flooring, etc.
Follow these steps, and your surfaces will stay pristine.
Treatment Costs: What to Expect
Costs vary by scope. VMC installation: €150–€1,500, including any adaptations. Capillary rise treatment: €30–€60 per linear meter.
Wall drying: Rent/buy dehumidifiers for €500–€2,000, or injection sanitation at €50 per 5 liters. Drainage: up to €3,000. Professional services: €2,000–€6,000 all-in. Add €10 per liter for repellents, plus finishing work.