While installing a soap dish in the shower, you accidentally drilled into an embedded water pipe. First step: shut off the water supply. Then, with the right tools and a systematic approach, repairing the leak is straightforward. This common scenario makes it the perfect example to demonstrate proven techniques used by experienced DIYers and plumbers.
The hole pierced a wall tile just above the faucets, so you'll need to remove the tile and surrounding mortar to access the copper pipe.
Since the pipe is only damaged on one side, brazing provides a reliable repair. Afterward, rebuild the masonry and replace the tile for a seamless finish.
Loosen the faucet handles slightly to avoid interference. Score the tile edges with a glass cutter or tungsten carbide scorer for controlled breakage.
Cover the shower area with a thick drop cloth. Use a small flat chisel at a low angle and a hammer to break the tile from the center outward. Strike carefully to prevent damage to adjacent tiles or faucets. Once removed, scrape away old adhesive for a level surface.
Excavate the mortar to expose about 5 cm of the pipe for repair access.
Clean the copper pipe by sanding with 80-grit abrasive, followed by 180-grit emery cloth, until the area gleams.
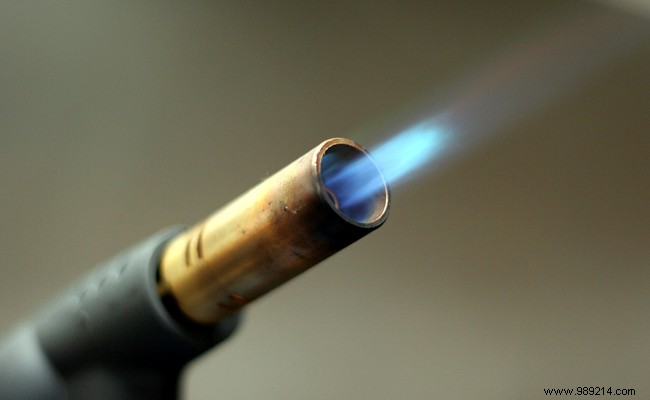
Apply flux with a small brush to aid solder flow. Heat the pipe with a butane torch until cherry-red. Dip a brass-based brazing rod in pickle paste (wear gloves), then feed it into the hole without removing the flame until it melts and fills the breach.
Work quickly to avoid overheating, which can weaken the joint. Cool, then test by turning the water on to check for leaks.
Mix repair mortar to a smooth, flexible consistency. Dampen the masonry to prevent water absorption, then pack the cavity flush with the wall using a narrow spatula.
After 24 hours, apply ready-to-use tile adhesive with a notched trowel, building it slightly thicker than neighboring tiles. Position the new tile and tap it home with a rubber mallet. Verify level and alignment with a straightedge.
The next day, grout with mortar using circular motions and a flexible squeegee. Wipe excess and smooth with a damp sponge. For beginners, ctendance offers straightforward DIY tips for everyday projects.
Purge air from the system by opening all bathroom faucets before brazing—otherwise, the solder won't adhere properly.
Save spare tiles after installation; they can save the day, as here.
Essential: Use a metal detector to locate pipes, wires, and hidden lines before drilling blindly.