
Do you have a vegetable garden? And you are looking for tips on how to grow fruits and vegetables easily? You are in the right place ! You will also need our homemade insect repellents.
IntroductionAs a seasoned crafter with years of hands-on experience creating boho accessories, Ive found that a simple twine-wrapped garland makes the perfect base for vibrant tassels. Add as many as you like, tailored to your color scheme for a personalized touch.Step 1Make the TasselsGently pull 6
Clear acrylic trays are ubiquitous—big ones, small ones, even compartmentalized versions. Theyre practical but undeniably plain. As crafting expert Jennifer Perkins shows, decoupage medium is the simple solution to add personality and flair.Jennifer PerkinsGlitter, seed beads, and confetti offer end
IntroductionDetermine Drywall Opening Size and LocationStart by deciding the size of your built-in shelving unit and its wall position. Avoid spots directly above or below switches, outlets, or fixtures to steer clear of electrical wires. Locate wall studs (typically 16 inches apart) and fit the uni
IntroductionMeasure the AreaAs a seasoned AV installer with years of home theater projects under my belt, I recommend installing speakers first to protect your displays from drywall dust. Measure from the wall to determine the horizontal positions of the outermost speakers, then measure down from th
Step 1: Install the Mounting BracketsPhoto by Jeffrey RowePhoto by Jeffrey RoweSecure the BracketsPosition the small cube-shaped brackets in the inside corners of the window frame. Orient one open side outward and the other toward the center (Image 1).Slide the blind unit into the brackets with the
IntroductionGather Your Tools and MaterialsWith years of hands-on experience restoring vintage furniture, Ive learned that folding chair straps wear out faster than aluminum frames. Opt for strong, weather-resistant nylon cord to reweave the seat and back for lasting durability.Step 1Prepare the Cha
Step 1Photo by Rennai HoeferCut the Honeycomb BallTrim the top and bottom of the honeycomb ball to create a perfect half-sphere shape.Step 2Photo by Rennai HoeferCraft Leaves and StemCut a leaf shape from green paper. Shape a stem and vine using brown floral wire.Step 3Photo by Rennai HoeferPhoto by
IntroductionWith just a fat quarter of fabric and terry cloth, you can create practical baby burp cloths that showcase adorable prints. As a sewing enthusiast with years of teaching beginners, I recommend this quick project—perfect for newbies and ideal for baby gifts.Step 1Cut the FabricCut the fat
Tools and Materials 4 PVC pipe Scrap wood Wood screws Painters tape 4 colors of spray paint (18) 1/4 x 3/4 screws with nuts Vinyl stickers Wooden peg or stick Tennis balls Circular or miter saw Hand saw Drill Step 1: Create a Cutting Template Ive built dozens of outdoor games like this, and a
Introduction After installing a two-tone bamboo floor, repurpose those leftover pieces into this striking modern chandelier. As seasoned DIY experts, weve crafted countless fixtures like this—watch the video to follow along easily. Step 1 Create the base Cut a piece of plywood for the base. Pro Tip
IntroductionVersatile Fabric ContainersAs an experienced crafter whos upcycled countless textiles, Ive found receiving blankets make perfect material for these sturdy baskets. Old sheets or fabric scraps work beautifully too, turning waste into functional home decor.Step 1Cut the FabricSlice your re
IntroductionRemove the Baseboard MoldingStart by carefully removing any existing baseboard molding around the room to create a clean surface for installation.Step 1Measure for WainscotingWith over a decade of hands-on carpentry experience, I recommend using a laser level set to your desired wainscot
Step 1Install the Wall FrameFrame the wall perimeter with pine boards: use 1x8 boards for the outer vertical pieces and 1x4 boards for horizontal runs. Apply construction adhesive to bond them securely to the wall, then fasten in place for a stable base.Step 2Add Vertical SupportsCut three additiona
Step 1Prepare the Dining Room and Remove the Old Chair RailThough this dining room (Image 1) appears standard, it features four moldings with varying start and stop points. For this project, well leave the door skin intact as it aligns perfectly with the crown molding at the wall tops.Begin by clear
IntroductionCut the PlywoodStart by cutting six pieces of 3/4-inch plywood to 36 by 8 inches. For safety and health, we recommend formaldehyde-free plywood, which avoids the toxins often present in standard varieties.Step 1Create a Square FrameCut out the center pieces for the shelves and build a sq
Step 1Choose the Right Wall Anchors and HardwareFor installing shelf standards, select appropriate wall anchors (Image 1). For drywall, drill a hole and insert the anchor, which expands to grip the screw securely. Options include durable plastic or metal versions for thicker walls. Butterfly bolts (
Step 1Apply Polyurethane Finish (Optional)Ipe, also known as Brazilian hickory, is a remarkably dense hardwood with stunning natural red and brown tones, making it perfect for elegant interior finishes. Like cedar, its inherent density offers superior moisture resistance, so no sealing is required—e
Step 1Measure and Mark the Installation AreaAs a professional installer with years of lighting projects, start by precisely measuring the shelf underside where the lights will go. Mark the borders clearly, then use a speed square to extend the line underneath. Draw a straight line across the bottom
Step 1Create end posts for the trim piecesAs a carpenter with over 15 years transforming homes into cozy rustic retreats, I recommend starting by measuring the areas between the top of the doors and the ceiling (in this case, covering two corners). Measure the other two corners from floor to ceiling
IntroductionBy Chelsea JacksonWith over a decade of hands-on home improvement experience, Ive transformed countless rooms using recessed panel wainscoting. This affordable upgrade delivers timeless elegance and can be completed in a weekend, including painting. Using standard hardwood plywood and di
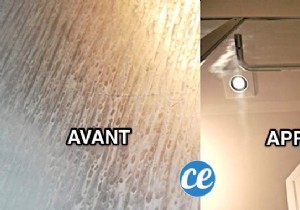 Dirty Shower Doors? This Proven Vinegar and Baking Soda Trick Keeps Them Spotless 2x Longer
 DIY Guide: Craft Rustic Moss-Covered House Numbers for Timeless Curb Appeal
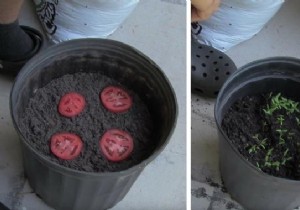 The Simplest Way to Grow Tomatoes from Overripe Fruit – A Gardener's Proven Hack
 16 Proven, Everyday Strategies to Slash Your Plastic Waste
 Effortless Keyboard Cleaning: 2 Proven White Vinegar Tips from Tech Experts